UBot Studio was a great product when I started working on it in 2012 – We’d already released the fourth version, which was a complete rewrite of version 3.5, in August/September of 2011. The new features of version 4.0 were things like image recognition, a cool feature that helped our customers make smarter, more powerful bots.
It took a few months in winter 2011 for me to work out some of the bugs that individual customers found with version 4.0 – I was basically buried in code for about 3 months, just optimizing and stabilizing things.
Once that was done, by 2012, we focused on adding features, mainly as they were requested by our customers. And since I saw this post on our forum recently:
I wanted to write one big post to show what features were programmed into the software in 2012, or as Seth says, “How UBot rocked your world in 2012.”
Maybe the most important feature, in my mind: Plugins:
Everybody likes new features.
I’m a pretty thorough programmer, so new features take some time to add. I try to test them, and to make sure that they work on multiple websites or what have you. We’ve set a goal to create one new feature per month. However, some months the features I work on take quite a bit longer – and in those cases, we are now able to have trust-worthy programmers besides me build in new features using our plugin API. It’s fairly simple to use, and means that we can integrate all sorts of products and features into UBot Studio faster than ever.
We created some of the features you saw in 2012 using the Plugin API, and they’re some of our best additions yet. The API also allows UBot users to have control over development and add features that are specific to their needs. As one customer said, the API and plugin feature is great “because it expands the scope of what features are possible within UBot, above and beyond what UBot development is working on, in case you have specific needs that might not fit those of the UBot community, a plugin could be developed to provide you that functionality.”
The API is available to use any time to build your own feature set. If you have some .net programming experience then it should be fairly simple for you to use.
Want to incorporate a web service into UBot Studio? Maybe add a few quick commands just for yourself? No problem – Just follow the instructions on our Wiki (http://wiki.ubotstudio.com/wiki/Plugin_Development) and submit a request for your plugin key (support.ubotstudio.com).
Here are some more of the best-loved features we added to UBot Studio in 2012 to rock your world!
1. Code View:
As a programmer, I think the other most important addition might have been Code View. This entirely new way to look at your scripts and bots is a simpler version of what other programming languages would consider their “regular” script view. Our regular script view is the “node” view, a graphical representation of your bots that is divided up by individual nodes, where loops and conditionals and other commands that “nest” inside one another are literally nested, like this:
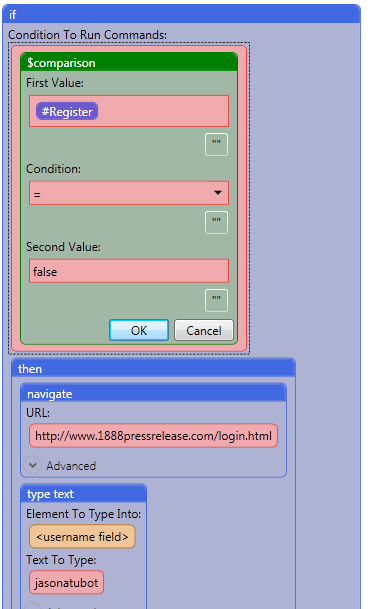
You can quickly see that inside the “if” command, there’s a comparison command. You can probably tell at a glance, even if you haven’t had any programming experience ever, that the comparison command checks to see if the first value, #Register, is equal to “false.” If it is, then the rest of the if “conditional” will take place. Inside that conditional is a navigate command, and inside the navigate command is a URL.
Using the node view you can drop commands onto the script window, visually see how they interact, and fill in all the required variables and answer any questions a command might need to run, without ever really learning the “art” of programming.
You can build a bot without any experience.
But, to program quickly, it helps to learn how those commands work individually, and to be able to edit them, move them around, and see more of them at a glance. So we added code view:

This is a simple text editor and translates every UBot command, parameter, etc, into words.
Here’s a quick video of me switching between the views, and adding a command to each to show what it looks like.
So code view changed the paradigm for how our customers could write their scripts. Use drag and drop if you’re feeling lazy or you’re new to the software, and switch to code view to blaze through your bot-building, or just to learn how the code really works at a more in-depth level.
2. Debugger / Step Mode:
Debugging refers to testing scripts for errors. The debugger allows you to see the contents of a list, table, variable, list item, table items, etc. This helps you isolate parts of a script that aren’t working properly by allowing you to check to see if the proper values are being assigned to each list or table or variable.
But in 2012, we added a “Step” button that allows you to move one command at a time through your script as well. The step button allows you to manually go through each command in a script to make sure the commands are working appropriately. It is used along with the debugger command for optimal debugging, because sometimes letting a script run all the way through is too fast to see why, for example, the loop isn’t working right, or why the scraping isn’t happening correctly.
3. Email commands:
Obviously email is an important aspect of any online business. While UBot Studio has been thought of as a browser-based bot building program, we’ve grown far beyond that, and having useful and simple email commands is a necessity. So we added a simple way for you to connect to mail servers, which makes sending and verifying emails using Hotmail, Gmail, Yahoo, AOL or any private SMTP a clear and easy process. The accompanying wizard makes setting up one’s credentials for each email service or SMTP very easy.
Sending email is a simple process where you just enter your credentials (you can use one set if you only have one set, or pull them from a text file if you want to send emails from several addresses.) But the real awesome addition is the ability to connect to the mail servers and “verify emails.” This command is specifically designed to either pull data from emails, or to click links that come inside of them. This mimics what a user would do who is checking their email – compile the info from it, or visit the links that are inside of it. Here’s a good example of how this might work:
Let’s say you’re a realtor and every day you get thirty emails from the MLS (Multiple Listing Service) database – instant updates about new houses on the market. Using set parameters inside the email wizard, you could pull the important info directly from each of those emails, every morning, and then compile them into an excel file, a text document, even a MySQL database, and send out a customized email to your clients listing the new additions.
Or, maybe you have a catch-all email and every day you receive a thousand emails inside with links that have to be clicked (maybe for a contest, because you’ve submitted a thousand blog comments across the web, or what have you). Again, using the email wizard, in a matter of seconds you can build script that will connect to your email, skim through every one of them, and click the relevant link that you’ve chosen in each.
Boom.
4. Windows Commands:
Obviously the ability to interact with Windows is a necessity for a lot of users. We’ve always had shell commands, which let users run windows scripts, and we’ve had the ability to read and write to text files and csv files so that you can always save information and read it again later with the most popular formats available. But UBot Studio continues to go beyond its browser-based roots with the Windows Commands.
These commands mimic a user interacting with Windows directly via the mouse and keyboard. You simply record the coordinates that you want to interact with, and the keystrokes or mouse clicks, and voila – you can build a program that will not only open a program, such as Photoshop or Word, but actually create images or documents, save them, etc. And of course, if there’s any crazy parts of a website that are hard to interact with directly via elements or even with image recognition, you can potentially use Windows Commands to solve the problem quickly and easily.
This is extremely useful for those of you using UBot Studio as a workplace automation tool. If your business or your clients’ business uses a proprietary or a standard software product in addition to the web, you can now build a script that automates that as well.
(Something sort of funny- from a programming perspective, this was a fairly simple set of commands to add. The hardest part was that despite the Windows platform being around longer than the web and controlled by a single company that entire time, it’s not easy to interact with their windows, dialog boxes, and elements. There’s just a ton of issues with how they build code in so many different ways. Compared to something like the web, where the standards are shifting quicker, commands are added more frequently, and more entities are involved in the standardization, it’s actually easier to work directly with the source (because the source is available—unlike in Windows, where everything is already “compiled” and you have interact with the results.)
5. Public and Private Bot Bank:
Ok, so you want to save a lot of frequently used scripts somewhere? And you want to share some commonly used scripts with other users, or see what other users have built? No problem!
You’ll notice that a lot of the features we add are specifically built for two groups: new users (who will find a lot of help in the Public Bot Bank), and experienced users (who will find the quick ability to save their most commonly used custom commands and scripts inside the Private Bot Bank a seriously helpful feature).
Simply create the category you want (or use one that’s already been created if you’re in the Public Bot Bank), name and explain what your script does, and then it’ll be saved for you to use at any time in the future.
6. Database Commands:
The Database Commands allow interaction between MySQL databases and your script in UBot Studio. You can see that yet again, we put a lot of thought into expanding UBot Studio beyond being solely a browser-based automation tool. We want it to be an all-in-one solution for newbies and programming geniuses alike.
So all you have to do now to directly pull data from your databases is drop in a simple MySQL “query with results” Command and throw your MySQL query into it, and you’re quickly able to grab all the info you want. And if you’d like to add data into your MySQL database, you can do that as well – which means you’ve got a whole new set of ways to automate your business, update your client list, and basically control your entire online customer interaction.
If you’re unclear on why MySQL interaction is cool, you might not be nerdy enough to get it. But basically, instead of using an excel file or something that’s relational in a 2-dimensional way, MySQL lets you create tables that are connected to each other, and then use that info on your web server or what have you. So when you have a list of (for example) customers, they’re often stored in a MySQL database that’s auto-updated with a list of info like the following:

Now, you could use a UBot Studio script to pull data directly from your customer list – for example, to send emails to a list of customers that’s automatically been created when they purchased on your site. There are hundreds of ways to use MySQL, and hundreds of ways to use UBot Studio – so combine these two and you’ve got an amazing opportunity to automate your stuff.
7: Developer Options Expanded:
When you buy our Developer Edition, we know that the goal is to create extremely customized, unique software. So in addition to removing all the elements of our UBot Studio branding, making it virtually impossible for someone to know that you used UBot Studio to create your software (if you choose to hide it), we did a whole lot more.
We added a compilation window that allows developer users to completely customize compiled bots by removing the run bar, navigation bar, and the browser. We also –let you now set the width and height of your compiled bots, and start your compiled bot minimized or maximized, and control the color very easily. We also added a UI HTML command, which lets anybody who knows a little HTML and CSS to customize the look of their compiled bots.
Now, you can create an extremely customized compiled bot that really makes the Dev edition an amazing option!
This feature allows you to change the user agent of your browser, thus affecting the way a webpage is displayed in the browser. This allows you to control the way a website is displayed to you, which makes it easier to automate processes on the website.
8. Set Browser Properties:
This set of commands allows you to send out information to webpages about browser properties such as width, height of a browser, and navigator options such as the App codename, app version, navigator language, etc.
9. Wait Commands Optimized:
For smoother running scripts, we worked on making sure this feature did exactly what it needed to do every time. Waiting for an element to load before running the rest of the script allows the script to run smoother and avoid interference. The wait commands can also be used to debug and isolate parts of a script that aren’t working properly by slowing down the script.
10. AI selector for flash buttons and images:
This simple feature might have gone unnoticed, but it allows you to select and click an item by image. It increased our drag-and-drop capabilities considerably.
11. Windows NTLM Authentication:
Without this, some businesses would not be able to automate the processes for the internal websites!
12. New type text Flash option:
This little “Flash Plugin” that allows you to type capital letters and symbols in flash forms is awesome because it removes simple but annoying limitations in flash forms where one could not capitalize letters or add @ symbols and such.
13. View Source Command/window:
This little feature allows you to look at the HTML on a webpage (for a more in-depth look into a webpage to find html elements such as the names, outer html, id or an item). Very useful if you’re checking out the source of a page for any reason.
Sometimes, it’s difficult to imagine that I could have done all of that in just a year, as well as improve the overall stability of UBot Studio. But with help from users giving support, suggestions, and bug reports, it’s all been pretty easy.
There will be much more to come in 2013. I hope you’re as excited as I am!
– Ed
Thank you for providing this excellent post. It will really help me get the most out of UBot Studio.
Our pleasure, and thank you!
We are at support.ubotstudio.com if you need any help along the way!
Well i can see that you guys worked on alot of plugins , but why not add those plugins yet 🙂
It is a careful process that is still ongoing. If you have any questions about the process, drop us a ticket at support.ubotstudio.com! 🙂
Been a user of Ubot Studio for a few years now. Started out with the Standard Edition, then moved up to Professional, and finally to Developer when the option became available. Worth every penny. I can’t imagine my online life without it now.
Keep up the great work!
I am really curious how you became a programmer Eddie. Did you go to school for it or are you self taught?