Define
Loops and if commands will get you far in life, but as your scripts grow in size, you will inevitably need better ways to manage them. Define lets you create your own commands and functions. When you define a command, you create a command that will run everything that you put inside the define command, aka all of its child commands and functions. Once created, your new command will automatically find it’s home in the toolbox under the “custom commands” category.
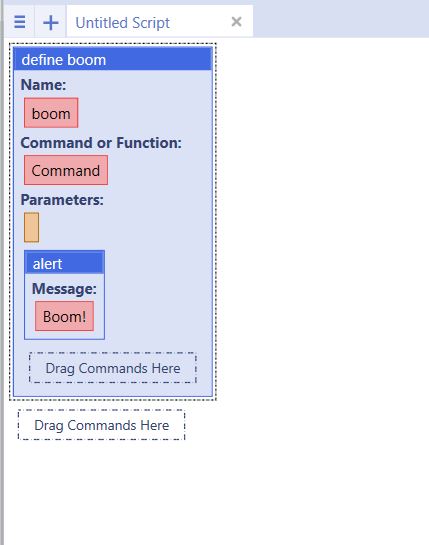
Let’s try it for ourselves. Clear your script and drag a define command into the script panel. Name it “boom”. Hit the ok button and then drag an alert command into your define command. Set the alert text to “Boom!”. Here’s what your script should look like:
Now look at your toolbar under “custom commands”. Boom. Note that if you were to run your script right now, nothing would happen. All you’ve done so far is created the definition of the command, and running the definition doesn’t do anything. To actually run the command, you’ll need to drag it over from the toolbox, then run it. Try it.
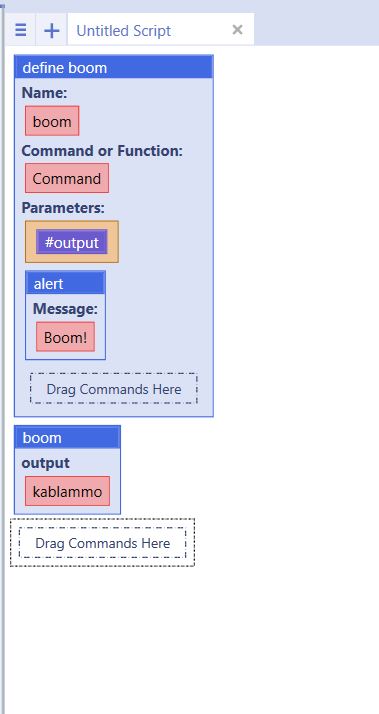
Defines are even more powerful when you add parameters. Parameters allow you to pass data into your defined command or function. Delete your boom command, right click on your define, and click “Edit”. Under “parameters” type “output”, and click “ok”. Go ahead and drag boom from the toolbox again, and you’ll notice that it has a parameter now! Type “kablammo” and hit “ok”. Your script should look like this:
Of course, we created the parameter, but we haven’t actually done anything with it yet. In your define, right click the alert command and click “Edit”. Delete what’s there and replace it with the #output variable, which you’ll find in the toolbox in the “variables” section. Your script should look like this:
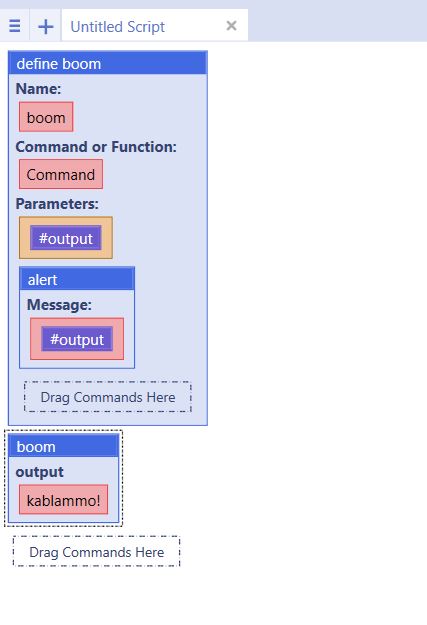
Go ahead and give it a run. Kablammo!
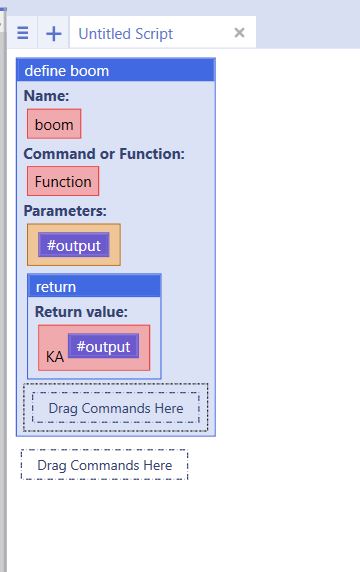
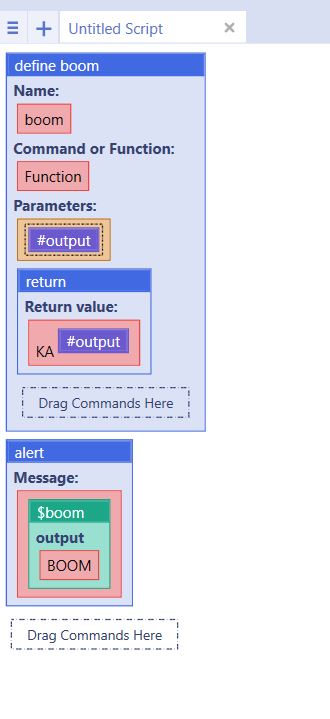
That covers variable defined commands, but define still has more power in store for us. Delete your boom command again. Now edit your define once more, and change “Command or Function” to “Function” and click ok. Delete the alert command. Instead, drag over a return command from the “Flow Commands” category. Inside it type “KA” and then drag your #output variable over. Click ok. Here is how your script should look:
Now, outside of your define, drag an alert command. For the text, look inside “Custom Functions” and drag over your $boom function. Inside your $boom function, type “BOOM” and click ok on all the open nodes. Here is how it should look:
Now run it. KABOOM!
Include
We won’t dive too deep here, but UBot Studio also gives you the ability to run defined commands and functions from other UBot Studio files. All you have to do is save your bot as a .ubot file. Then from a new bot, place the include command at the top of the script. Don’t actually do it right now, or your browser will refresh to a different page. Remember to put the include command at the top of your script, since it won’t work if it is placed elsewhere in the script.
When you include files, the defined commands and functions will be loaded into the toolbox, under categories based on the name of the .ubot file.
Threads
May he/she who has a weak constitution turn back now. Threading is big boy/girl territory. I recommend you don’t even read this tutorial until you are very comfortable with UBot Studio.
…
…
I’ll wait.
…
Ok. Threading is a fancy programming concept that allows us to completely break the flow of the script and run commands simultaneously with other commands. Imagine walking down a path and coming to a fork. You could choose to go down one path or the other, or you could go down one path and send your buddy down the other, so that both paths are being walked at the same time. That’s what threading is like.
Consider the following script:
ui stat monitor(“Tasks Complete:”,#tasks complete)
set(#tasks complete,0,”Global”)
loop(50) {
increment(#tasks complete)
wait(1)
}
If you load up that script, you’ll see #tasks complete slowly climb over the course of a minute. The wait command here simulates something like a web page loading, or some other internet tasks that takes some amount of time.
Now let’s consider another script:
ui stat monitor(“Tasks Complete:”,#tasks complete)
set(#tasks complete,0,”Global”)
loop(50) {
thread {
increment(#tasks complete)
wait(1)
}
}
The only difference here is the thread command inside the loop. If you run that, #tasks complete will jump to 50 almost instantaneously. This is because each loop iteration is now running in its own thread, each executing simultaneously instead of one after another.
As you might imagine, the implications for this are massive. Imagine being able to infinitely multiply the speed at which your bots can work for you! But before we get carried away, it’s important to understand that threading is difficult and dangerous. Even if your imagination is infinite and unlimited, your computer certainly isn’t.
The reasons why threading is so wrought with difficulty can be a little technical, so I’ll illustrate it with an example. Imagine a hat filled with slips of paper, each slip being printed with a single chore. Now imagine a line of 50 monkey butlers. They one by one approach the hat, reach into it, and pull out a slip of paper. The monkey butler then proceeds to complete the chore written on the paper, and by the end of the day you have a clean house.
Now imagine that instead of a neat line of monkey butlers, they all try to reach into the hat at the same time. Some of them reach for the same piece of paper only to have it snatched up by another monkey, some of them grab the same paper and tear it, and some of them can’t reach in at all because there are too many monkey paws in their way, so they gouge the eyes of the monkey in their way in a 3-stooges-like display of frustration. In a worst case scenario, this is what threading is like. In a best case scenario, your army of well-orchestrated monkey butlers complete the job in record time.
When you actually start using threads, you’ll find yourself trying to solve problems with how variables can be used across threads, and how to count how many threads have been completed. We saw these issues over and over in the UBot Community. We responded to some of these problems by creating the thread spawn command.
The thread spawn command takes a common threading design pattern and wraps it up in a toasted bun. I’ll explain the concept behind it by extending my previous analogy. Imagine you have a hat with exactly 100 slips of paper, each printed with a chore. You have 50 monkey butlers to complete the chores. Each monkey reaches into the hat, takes a slip of paper, completes the chore, and comes back to the hat. If there are more chores, the monkey will take another slip of paper, and repeat until all the chores are done. All that is to say, there are 100 total tasks, and 50 of them can be run concurrently.
Using thread spawn, the script from above might look something like this:
ui stat monitor(“Tasks Complete:”,#tasks complete)
set(#tasks complete,0,”Global”)
thread spawn(100,50) {
increment(#tasks complete)
wait(1)
}
So yeah, threading is scary, difficult, and dangerous if done incorrectly. But with proper scripting practices, it can be one of the most powerful tools a ubotter has at his disposal.