At its heart, UBot Studio is a tool for creating web bots. The web is like an alternate universe where we get around by clicking and typing, where data is at the core of everything, where cats are ubiquitous.
You might think of a mouse and keyboard like the arms and legs of a uBot. Except that in the case of a uBot, the mouse and keyboard are virtual. The mouse and keyboard are the main method that bots (and people for that matter) use to move through and interact with the internet. This is one of the ways UBot Studio is easier to understand and get started with than other programming tools, which use more complicated methods of interacting with the internets.
Of course, it’s not enough to just click and type randomly. Our uBots need a way to see what they’re doing, a way to know what to click and type into. Selectors are the eyes and ears of a uBot. A selector is a code that identifies an element on a web page. An element can be a button, a text box, a paragraph, or literally anything else on a web page. Selectors are written in their own special selector language, but don’t worry, selectors are created automatically, and even advanced selectors can be created automatically with the Advanced Element Editor window. All that is to say, you don’t have to learn the selector language if you don’t want to. UBot can do it all for you.
Let’s look at some examples to make sense of all this. Try dragging the following button into the script window:
Did it create a click command for you? Awesome. Click OK and then click the run button. It should click the button as expect. Let’s go back and deconstruct it a bit more. Right click on the click command and choose “edit”. Notice the “Element” attribute. It should say something like []. This tells UScript to look in the web page for an element that has a [] of []. If that didn’t make sense, don’t worry about it for now. Just know that the selector is telling UScript where to click.
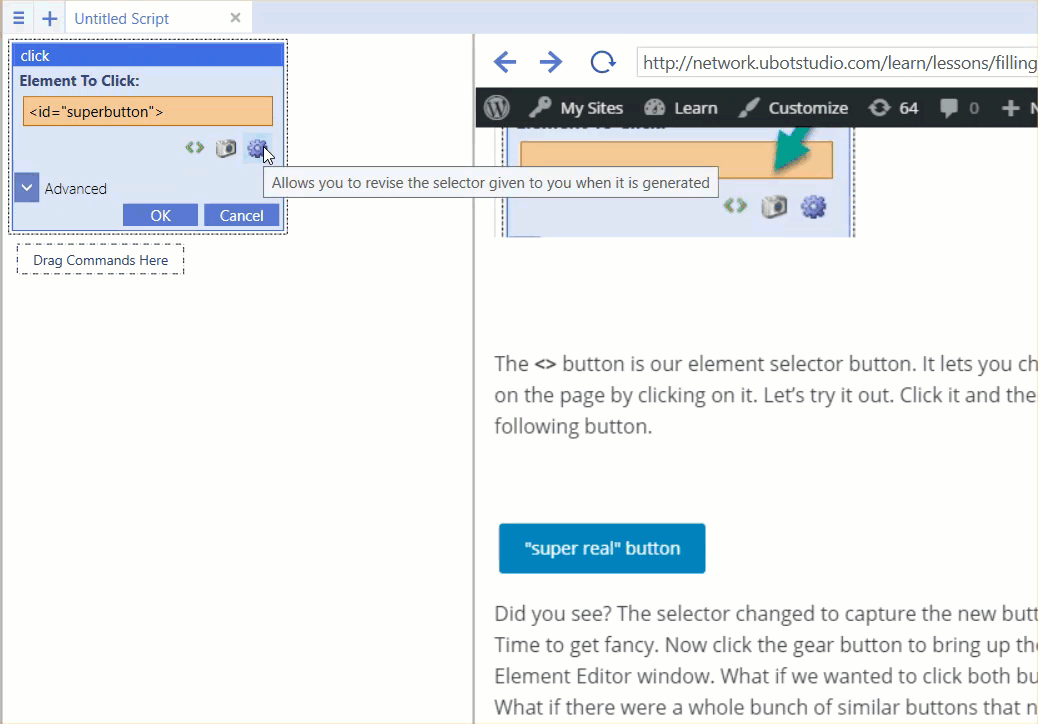
Notice there are some buttons under the Element parameter. Let’s look at those.
![]()
The <> button is our element selector button. It lets you choose an element on the page by clicking on it. Let’s try it out. Click it and then click the following button.
Did you see? The selector changed to capture the new button. Awesome. Time to get fancy. Now click the gear button to bring up the Advanced Element Editor window. What if we wanted to click both buttons in one go? What if there were a whole bunch of similar buttons that needed to be clicked? In this example, our buttons have a similar class attribute. In the attribute drop down, select “class”, and the window gives you an appropriate selector.
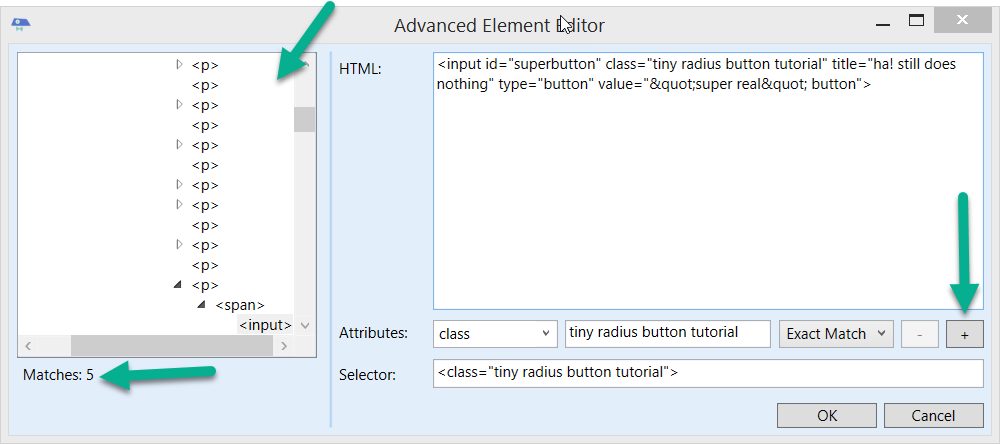
Let’s take a closer look at this window. On the right side, at the top, we have the html for the element that was selected originally. Below that, as already discussed, we have our attribute field and our finished selector field. Notice that you can add more attributes, allowing you to be very specific about how to find an element. For now, just keep the one attribute.
On the right side of the window is an html tree that shows the html code hierarchy. This is useful when it’s hard to click on the exact element that you want to bring it up in the window. Perhaps you actually want the div behind the element? Maybe you wanted an invisible input that lives next to the element? Underneath the html tree, it tells you how many matches there are for the current selector. If you’re following everything correctly, there should be 5 matches.
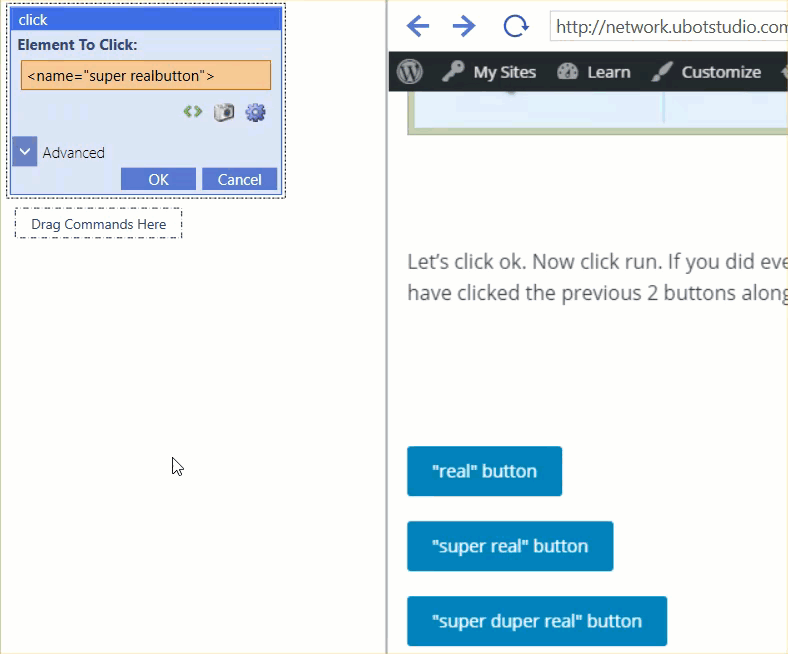
Let’s click ok. Now click run. If you did everything correctly, UBot Studio should have clicked the previous 2 buttons along with the following three buttons.
Perfect (I assume)! If you’re using the Pro or Dev editions, there’s one more useful button. The camera button allows you to use UBot Studio’s image recognition. By drawing a rectangle around the desired element, you can take a snapshot of what it looks like, and later interact with it as though you were using any other selector. Here’s what that would look like:
Try it on this next button:
Important: When you click a button that loads a new page, you have to tell UScript to wait for the new page to load. There are a few ways to do this, but the standard way is to use the wait for browser event command with the event parameter set to “dom ready”. If you don’t wait for the page to load, your subsequent commands might not work!
Now that we have a solid understanding of what selectors are, let’s look at what else we can do with them. UBot Studio has a command for all of the common interactions you might have with a web browser, as well as a few that let you dive a little deeper. For Example, the type text command will type text into a text field. The selector points to a text field and the Text parameter tells UScript what to type into it. Let’s try it. Delete all the commands you’ve created so far, then see if you can use the type text command to fill this text field. You can use any of the selector choosing methods we’ve learned so far.
The change dropdown command works like the commands we’ve seen so far, but it has an added benefit of reading the options in a drop down and letting you select from them. Note that this only works if you drag the dropdown from the browser into the script panel. In addition to the options in a drop down box, you can also choose a random option. A lot of dropdowns will make the first option say something like “Please choose one of the following”, so the “change dropdown” command also gives you the option to choose a random option while ignoring the first one. Here’s a dropdown for you to try it on:
Select Below:
The change checkbox command allows you to check or uncheck a checkbox. It’s pretty straightforward, so I’m just gonna let you play with it.
Check Here
“Radio buttons” act similarly to both checkboxes and buttons. For this reason, both change checkbox and click will work on a radio button. If you drag it from the browser, UBot Studio will create a click command for you. You can drag a change checkbox command from the toolbox if you prefer. Try some different things, and see what feels right to you.
Finally, we have a change file field command. File fields are tricky business when it comes to how web browsers process them, but UBot studio has you covered. Just drag a file field over, choose a file, and you’re good to go.
Great! I’m not actually checking to see if you succeeded, but I’ll bet you did! Good job!